SCC Continued
SCC Continued
We’ll now delve into three more topics on SCC:
- SCC Modules
- Python environments on SCC
SCC Modules
SCC Modules Intro
When you connect to an SCC login or compute node, you are running in a default environment with some default software installed.
On SCC you use the module command to load software you need for your project.
There’s a nice Module Basics webpage on the BU TechWeb.
We’ll cover some of the most command commands here.
module list
To see what modules are currently loaded:
$ module list
No modules loaded
To see what modules are available:
$ module avail

---------------------------------- /share/module.8/bioinformatics ----------------------------------
   admixture/1.3.0                               maker/3.01.04
   agat/0.7.0                                    manta/1.6.0
   angsd/0.923                                   maps/1.1.0
   angsd/0.935                            (D)    maxbin/2.2.7
   annovar/2018apr                               maxentscan/20Apr2004
   annovar/2019oct24                      (D)    maxquant/1.6.14
   anvio/7.1                                     maxquant/1.6.17.0                    (D)
   artemis/18.0.3                                megahit/1.2.9
   atacgraph/2021-04-15_gitf5dc970               melt/2.1.5
   augustus/3.3.2                                meme/5.3.0
   bakta/1.5.1                                   meme/5.3.3
   bamtools/2.5.1                                meme/5.5.5                           (D)
       ...                                         ...
…which is not that helpful since it lists all the available modules, and each available version of each module.
But let’s look at python specifically. First let’s see which version is installed by default:
$ which python
/usr/bin/python

$ python --version
Python 3.6.8

$ which python3
/usr/bin/python3

$ python3 --version
Python 3.6.8

$ which pip
/usr/bin/which: no pip in (/usr/java/default/jre/bin:/usr/java/default/bin:/usr/local/bin:/usr/bin:/
usr/local/sbin:/usr/sbin:/opt/dell/srvadmin/bin:/opt/TurboVNC/bin:/usr2/faculty/tgardos/bin:.:/usr2/
faculty/tgardos/.local/share/JetBrains/Toolbox/scripts)

$ which pip3
/usr/bin/pip3

$ pip3 --version
pip 9.0.3 from /usr/lib/python3.6/site-packages (python 3.6)
We can list modules that match a name pattern:
$ module avail python

----------------------------------- /share/module.8/programming ------------------------------------
   python2-intel/2019.4.088        python3/3.6.5     python3/3.7.9           python3/3.9.4
   python2-intel/2019.5.098 (D)    python3/3.6.9     python3/3.7.10          python3/3.9.9
   python2/2.7.13                  python3/3.6.10    python3/3.8.3           python3/3.10.5
   python2/2.7.15                  python3/3.6.12    python3/3.8.6           python3/3.10.12
   python2/2.7.16           (D)    python3/3.7.3     python3/3.8.10.clean    python3/3.12.4  (D)
   python3-intel/2021.1.1          python3/3.7.5     python3/3.8.10
   python3-intel/2022.2.0   (D)    python3/3.7.7     python3/3.8.16

  Where:
   D:  Default Module

If the avail list is too long consider trying:

"module --default avail" or "ml -d av" to just list the default modules.
"module overview" or "ml ov" to display the number of modules for each name.

Use "module spider" to find all possible modules and extensions.
Use "module keyword key1 key2 ..." to search for all possible modules matching any of the "keys".
We see many versions of python3 and even python2.
Note the (D) next to some versions. These are the default versions.
If we want to load a specific version, we can type:
$ module load python3/3.10.12Or we can load the default version with:
$ module load python3So let’s load the default version which happens to be the latest version:
$ module load python3Now let’s check our python version:
$ python --version
Python 3.12.4

$ python3 --version
Python 3.12.4

$ pip --version
pip 24.1.1 from /share/pkg.8/python3/3.12.4/install/lib/python3.12/site-packages/pip (python 3.12)

$ pip3 --version
pip 24.1.1 from /share/pkg.8/python3/3.12.4/install/lib/python3.12/site-packages/pip (python 3.12)

$ which python3
/share/pkg.8/python3/3.12.4/install/bin/python3
And we can see that the module is loaded:
$ module list
Currently Loaded Modules:
  1) python3/3.12.4
Note that you can even load some python packages as modules. These tend to be the bigger packages like pytorch, tensorflow, etc.
$ module avail pytorch

--------------------------------- /share/module.8/machine-learning ---------------------------------
   pytorch/1.1    pytorch/1.5.1    pytorch/1.8.1     pytorch/1.11.0
   pytorch/1.3    pytorch/1.6.0    pytorch/1.9.0     pytorch/1.12.1
   pytorch/1.5    pytorch/1.7.0    pytorch/1.10.2    pytorch/1.13.1 (D)

---------------------------------- /share/module.8/visualization -----------------------------------
   pytorch3d/0.7.0    pytorch3d/0.7.3 (D)

  Where:
   D:  Default Module
Just be careful because module doesn’t load package dependencies and or check for conflicts.
But it may be more efficient to load large packages this way, rather than pip or conda install.
Prepackaged ML Module
SCC also has a prepackaged machine learning super module called academic-ml.
Let’s see what’s available.
$ module avail academic-ml
----------------------------------- /share/module.8/programming ------------------------------------
   academic-ml/fall-2024 (D)    academic-ml/spring-2024
There will be a new, updated version added every semester.
------------------------------------------------------------------------------------------------
   /share/module.8/programming/academic-ml/fall-2024.lua:
------------------------------------------------------------------------------------------------

academic-ml fall-2024: This provides a Python 3.11 conda environment with popular machine
learning libraries pre-loaded. New versions will be created for the start of the Spring and Fall
semesters.

This module provides a trio of conda environments. All of these will correctly use GPUs when run
on GPU-equipped compute nodes, and will run on CPU-only compute nodes as well.

To activate the PyTorch-based environment do:

    module load miniconda
    conda activate fall-2024-pyt

To activate the Tensorflow-based environment do:

    module load miniconda
    conda activate fall-2024-tf

And finally, to activate the Jax-based environment do:

    module load miniconda
    conda activate fall-2024-jax

The PyTorch environment provides:
    * PyTorch v2.4.0 (https://pytorch.org/)
    * torchaudio, torchvision, torchtext, torchdata (https://pytorch.org/)
    * PyTorch Lightning (https://lightning.ai/docs/pytorch/stable/)
    * Magma (https://icl.utk.edu/magma/)
    * Whisper (https://github.com/openai/whisper)
    * Intel Extension for PyTorch (https://github.com/intel/intel-extension-for-pytorch)


The Tensorflow environment provides:
    * Tensorflow v2.17.0 (https://www.tensorflow.org)
    * tensorflow-probability, tensorflow-similarity, tensorflow-estimator,
      tensorflow-datasets, tensorflow-hub, tensorflow-recommenders (https://www.tensorflow.org)
    * JAX v0.4.30 (CPU-only) (https://jax.readthedocs.io)
    * For tips on setting Tensorflow parallelism, see: https://dl.acm.org/doi/pdf/10.1145/3431388

The Jax environment provides:
    * Jax v0.4.30 (https://jax.readthedocs.io)
    * PyTorch v2.4.0 (CPU-only) (https://pytorch.org/)
    * Tensorflow v2.17.0 (CPU-only) (https://www.tensorflow.org)

Jax-based programs typically use the dataloaders from PyTorch or Tensorflow, which is why those
libraries are installed with this environment.

The following lists of libraries and software are common to all environments:

    * Machine learning and CUDA GPU libraries:
        ** Tensorboard (https://www.tensorflow.org)
        ** Transformers (https://huggingface.co/)
        ** Numba (https://numba.pydata.org)
        ** NLTK (https://www.nltk.org/)
        ** Gensim (https://radimrehurek.com/gensim/)
        ** Spacy (https://spacy.io/)
        ** scikit-learn (https://scikit-learn.org)
        ** scikit-image (https://scikit-image.org)
        ** OpenAI models (https://platform.openai.com)

    * Popular libraries:
        ** Numpy (https://numpy.org)
        ** Scipy (https://scipy.org)
        ** Pandas (https://pandas.pydata.org)
        ** OpenCV (https://opencv.org)
        ** Pillow (https://python-pillow.org)
        ** NetworkX (https://networkx.org)
        ** graph-tool (https://graph-tool.skewed.de)
        ** Dask (https://www.dask.org)
        ** Polars (https://pola.rs)

    * Development tools:
        ** gcc and g++ compilers v13.2.0 (https://gcc.gnu.org/)
        ** Nvidia CUDA SDK (https://developer.nvidia.com/)
        ** Jupyter Lab and Notebook (https://jupyter.org)
        ** Spyder (https://www.spyder-ide.org)
You can also see this page for better formatted content.
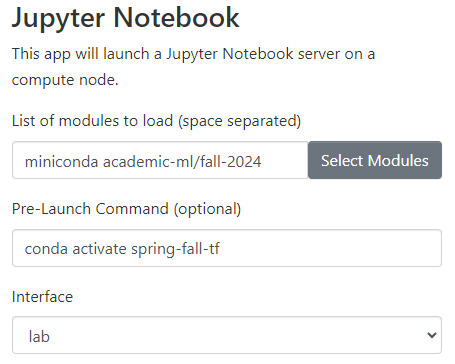
Interactive Sessions with Specific Modules
From TechWeb:
When requesting a Jupyter Notebook, Jupyter Lab, or Spyder OnDemand session, enter the conda activation command in the Pre-Launch Command field. This screenshot shows an example of starting a Jupyter Lab session with the fall-2024-tf environment.
module unload
To remove modules from your environment you can use the
module unload [modulename]command.
Python Envs on SCC
Python Environments on SCC
It is highly recommended to use the prepackaged academic-ml module if you can because it saves you from some storage quota limitations as we’ll show here.
But sometimes, you need more control over the python packages you use, for example if an open source project needs specific package versions.
You cannot install python packages to the system python installation. You have to create a python virtual environment and install packages to that.
Be careful when installing packages, because you may accidentally fill up your home folder storage quota.
Here’s how to avoid that.
Python and Virtual Environments
So let’s assume we ran
$ module load python3Note that it comes with many packages already installed, but not necessarily the version or packages you need for your project.
Run pip list to find out.
To install additional packages, you first have to create a virtual environment and then install the packages there.
Installing Packages into Virtual Environment
In this process, you will create a python virtual environment outside of your home directory and invoke it.
The SCC instructions use virtualenv. Below we use venv. You may also consider using the pipenv framework. The process is similar for each.
Load the python version you plan to use.
$ module load python3/3.X.YNow create the virtual environment in the /projectnb/sparkgrp space. Either in a location to share with team members:
$ python3 -m venv /projectnb/sparkgrp/venvs/projectname/mynewenvOr in your own workspace there.
$ python3 -m venv /projectnb/sparkgrp/workspaces/yourusername/mynewenv
Then you can activate the virtual environment
# Activate shared virtual environment
$ source /projectnb/sparkgrp/venvs/projectname/mynewenv/bin/activate

# Or activate personal virtual environment
$ source /projectnb/sparkgrp/workspaces/yourusername/mynewenv/bin/activate
As opposed to the shared packages option of the previous section, to install additional packages you only need to run a simple pip command:
$ pip install packagename
and finally to deactivate the virtual environment, just type
$ deactivateas usual.
Package Caches
You may find that even though you create and run virtual environments on your project folder, you get quote exceeded error for your home directory. This could be because conda or pip are caching python installation packages in your home directory.
Package Caches – Conda
For Conda, try running
conda infoAnd look for the section called package cache :. See shared-pkg-cache for a little more info.
As example, for me:
$ conda info
     active environment : base
    active env location : /share/pkg.8/miniconda/24.5.0/install
            shell level : 1
       user config file : /usr2/faculty/tgardos/.condarc
 populated config files : /share/pkg.8/miniconda/24.5.0/install/.condarc
                          /usr2/faculty/tgardos/.condarc
          conda version : 24.5.0
    conda-build version : not installed
         python version : 3.12.4.final.0

   ...

          package cache : /projectnb/ds549/tgardos/.conda/pkgs
                          /usr2/faculty/tgardos/.conda/pkgs
       envs directories : /share/pkg.8/academic-ml/fall-2024/install
                          /projectnb/ds549/tgardos/.conda/envs
                          /usr2/faculty/tgardos/.conda/envs
                          /share/pkg.8/miniconda/24.5.0/install/envs
...
Package Caches – PIP
For PIP, try running
pip cache dir
pip cache info
to find out more about where pip is caching. See caching for more info.
It seems that SCC has disabled pip caching as of Fall 2024 (or maybe earlier).