Adapted from PyTorch Quickstart to use CIFAR10 dataset instead of FashionMNIST.
Code for processing data samples can get messy and hard to maintain
We ideally want our dataset code to be decoupled from our model training code for better readability and modularity.
PyTorch Data Primitives
PyTorch provides two data primitives:
torch.utils.data.DataLoader and
torch.utils.data.Dataset
that allow you to use pre-loaded datasets as well as your own data.
Dataset stores the samples and their corresponding labels, and
DataLoader wraps an iterable around the Dataset to enable easy access to the samples.
Note
An iterable is a Python object capable of returning its members one at a time. It must implement the __iter__ method or the __getitem__ method. See Iterators for more details.
Pre-loaded Datasets
PyTorch provides a number of pre-loaded datasets (such as FashionMNIST or CIFAR10) that subclass torch.utils.data.Dataset and implement functions specific to the particular data.
They can be used to prototype and benchmark your model.
In this case we simply use the ToTensor transform which converts the image from a (H x W x C) shape to a (C x H x W) shape and converts the pixel values from [0,255] to a torch.FloatTensor in the range [0.0, 1.0].
% ls -al datatotal 333008drwxr-xr-x@ 6 tomg staff 192 Oct 1 22:14 .drwxr-xr-x 62 tomg staff 1984 Oct 17 11:09 ..drwxr-xr-x@ 10 tomg staff 320 Jun 4 2009 cifar-10-batches-py-rw-r--r--@ 1 tomg staff 170498071 Sep 4 19:51 cifar-10-python.tar.gz
And the contents of the cifar-10-batches-py directory.
% ls -al data/cifar-10-batches-py total 363752drwxr-xr-x@ 10 tomg staff 320 Jun 4 2009 .drwxr-xr-x@ 6 tomg staff 192 Oct 1 22:14 ..-rw-r--r--@ 1 tomg staff 158 Mar 31 2009 batches.meta-rw-r--r--@ 1 tomg staff 31035704 Mar 31 2009 data_batch_1-rw-r--r--@ 1 tomg staff 31035320 Mar 31 2009 data_batch_2-rw-r--r--@ 1 tomg staff 31035999 Mar 31 2009 data_batch_3-rw-r--r--@ 1 tomg staff 31035696 Mar 31 2009 data_batch_4-rw-r--r--@ 1 tomg staff 31035623 Mar 31 2009 data_batch_5-rw-r--r--@ 1 tomg staff 88 Jun 4 2009 readme.html-rw-r--r--@ 1 tomg staff 31035526 Mar 31 2009 test_batch
You see in this case the images aren’t stored individually, but rather as combined batches. The CIFAR10 Dataset and DataLoader classes hide these details from us.
Iterating and Visualizing the Dataset
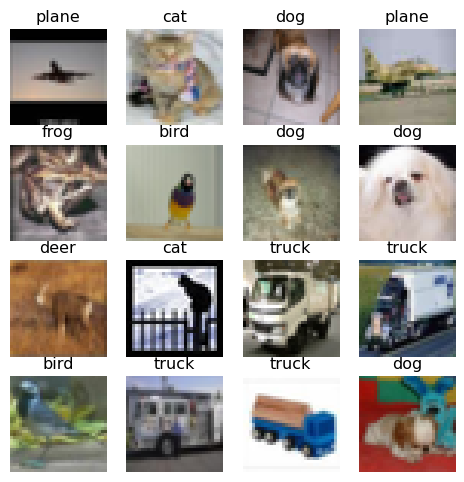
It’s very important to understand the data you’re working with. Visually inspecting the dataset is a good way to get started.
We can index Datasets manually like a list: training_data[index]. In this case we randomly sample images from the dataset.
We use matplotlib to visualize some samples in our training data.
Try re-running the above cell a few times to see different samples from the dataset.
Collecting Sample Data to Illustrate Custom Dataset
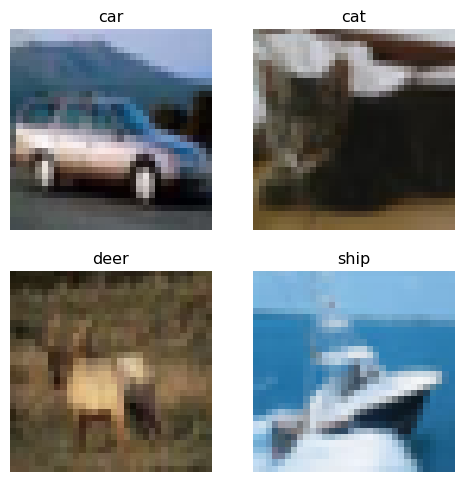
To illustrate creating a custom dataset, we will collect images from the CIFAR10 dataset and save them to a local directory. We will also save the labels to a CSV file.
import osimport pandas as pdfrom torchvision import datasetsfrom torchvision.transforms import ToTensorfrom PIL import Image# Create directories to store images and annotationsos.makedirs('cifar10_images', exist_ok=True)annotations_file ='cifar10_annotations.csv'# Load CIFAR10 datasetcifar10 = datasets.CIFAR10(root='data', train=True, download=True, transform=ToTensor())# Number of images to downloadn_images =10# Store images and their labelsdata = []for i inrange(n_images): img, label = cifar10[i] img = img.permute(1, 2, 0) # Convert from (C, H, W) to (H, W, C) img = (img *255).byte().numpy() # Convert to numpy array and scale to [0, 255] img = Image.fromarray(img) # Convert to PIL Image img_filename =f'cifar10_images/img_{i}.png' img.save(img_filename) # Save image data.append([img_filename, label]) # Append image path and label to data list# Write annotations to CSV filedf = pd.DataFrame(data, columns=['image_path', 'label'])df.to_csv(annotations_file, index=False)print(f"Saved {n_images} images and their labels to {annotations_file}")
Saved 10 images and their labels to cifar10_annotations.csv
# List the directory `cifar_imagesimport osos.listdir('cifar10_images')
import pandas as pd# Read the annotations fileannotations = pd.read_csv('cifar10_annotations.csv')# Display the first 10 lines of the annotations fileprint(annotations.head(10))
The __init__ function is run once when instantiating the Dataset object. We initialize the directory containing the images, the annotations file, and both transforms (covered in more detail in the next section).
This also works for: * masks (torchvision.tv_tensors.Mask) for object segmentation or semantic segmentation, or * videos (torchvision.tv_tensors.Video)
We could have passed them to the transforms in exactly the same way.
one where we passed a single image as input i.e. out = transforms(img), and
one where we passed both an image and bounding boxes, i.e. out_img, out_boxes = transforms(img, boxes).
Transforms support arbitrary input structures.
The input can be e.g. a single image, a tuple, an arbitrarily nested dictionary…
The same structure will be returned as output.
Below, we use the same detection transforms, but pass a tuple (image, target_dict) as input and we’re getting the same structure as output:
target = {"boxes": boxes,"labels": torch.arange(boxes.shape[0]),"this_is_ignored": ("arbitrary", {"structure": "!"})}# Re-using the transforms and definitions from above.out_img, out_target = transforms(img, target)plot([(img, target["boxes"]), (out_img, out_target["boxes"])])print(f"{out_target['this_is_ignored']}")
('arbitrary', {'structure': '!'})
We passed a tuple so we get a tuple back, and the second element is the tranformed target dict.
Transforms don’t really care about the structure of the input; as mentioned above, they only care about the type of the objects and transforms them accordingly.
Foreign objects like strings or ints are simply passed-through. This can be useful e.g. if you want to associate a path with every single sample when debugging!
Transforms and Datasets intercompatibility
Roughly speaking, the output of the datasets must correspond to the input of the transforms. How to do that depends on whether you’re using the torchvision built-in datatsets, or your own custom datasets.
Using built-in datasets
If you’re just doing image classification, you don’t need to do anything. Just use transform argument of the dataset e.g. ImageNet(..., transform=transforms).
Compatbility with Older Datasets
Torchvision also supports datasets for object detection or segmentation like torchvision.datasets.CocoDetection. Those datasets predate the existence of the transforms.v2 module and of the TVTensors, so they don’t return TVTensors out of the box.
An easy way to force those datasets to return TVTensors and to make them compatible with v2 transforms is to use the wrap_dataset_for_transforms_v2 function:
from torchvision.datasets import CocoDetection, wrap_dataset_for_transforms_v2dataset = CocoDetection(..., transforms=my_transforms)dataset = wrap_dataset_for_transforms_v2(dataset)# Now the dataset returns TVTensors!
Using your own datasets
If you have a custom dataset, then you’ll need to convert your objects into the appropriate TVTensor classes.